In part 3 we integrated the reduced standard C library (newlib-nano) and set up printf()to output characters over UART. Up until now, we have built the project using make and we have configured the peripherals with direct register access. This works perfectly fine, but as our project grows, we may benefit from using a more advanced build system to make build configuration more manageable, and from using a hardware abstraction layer to speed up hardware configuration.
In this part we will discover how to use CMake to make our build process platform-agnostic and modular. We are also going to add the STM32CubeF4 MCU Firmware Package from STMicroelectronics to facilitate hardware configuration.
What is CMake?
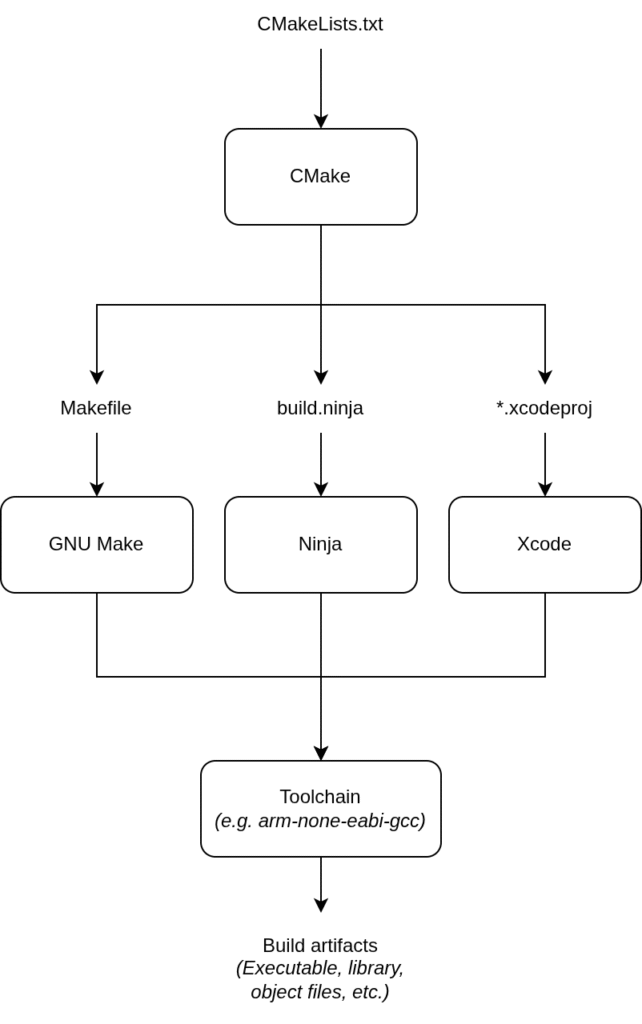
CMake (“cross-platform make”) is a cross-platform meta-build system, available on Linux, Windows, and MacOS. Being a meta-build system, it does not actually build anything itself, but it allows you to configure the build process in a platform-agnostic manner. You type your build configuration into a text file named CMakeLists.txt, which can then be used to generate build files for a variety of different build automation tools. For example, you can generate build files for GNU Make on Linux, Ninja on Windows, or Xcode on macOS. After generating the build files, you then build the project with the specific build automation tool using a specific toolchain. The entire process is outlined in the figure below:
This makes it easier for developers on different operatings systems to use the same codebase. Also, it is very easy to swap out the toolchain and cross-compile for different target systems using toolchain files, which we will discuss later.
As a project grows in size, handling the build process with Makefiles also tend to get a little messy. I find that CMake makes it a lot more manageable, since it allows you to conveniently modularize the build process. Imagine that your source files are organized by functionality, e.g. hardware drivers, common modules, third-party libraries, application code and so on. Instead of configuring the entire build process in a single CMakeLists.txt, you configure each part separately in its own CMakeLists.txt and then you bind everything together in the root CMakeLists.txt. See the file structure below for example:
project_root/
├── CMakeLists.txt
├── cmake/
│   ├── stm32f410rb.cmake
│   └── cmsis.cmake
├── third_party/
│   └── CMSIS/
├── drivers/
│   ├── CMakeLists.txt
│   ├── gpio.c
│   └── i2c.c
├── common/
│   ├── CMakeLists.txt
│   ├── utils.c
│   └── dsp.c
└── application/
    ├── CMakeLists.txt
    ├── main.c
    └── blink_task.c
Drivers, common modules and application modules are compiled into separate static libraries. If we have any third party libraries that do not use CMake natively, we can write a .cmake file in our own project tree to build the library, without polluting the library’s original source code with a CMakeLists.txt. In the root CMakeLists.txt we then build the executable by linking to all the static libraries, keeping it nice and modular.
Let us see how we can migrate from our current Makefile setup to CMake.
Migrating from GNU Make to CMake
Recall from part 2 when we wrote our Makefile, that we first specified which compiler to use, defined a bunch of compiler and linker flags, and then defined two main targets: The main executable and a phony target to flash the program to our device. We are going to replicate this in CMake, but instead of keeping everything in one file, we are going to separate the hardware-specific configuration from the generic project configuration by creating a toolchain file separately from CMakeLists.txt. We can pass this toolchain file to CMake in the configuration step to build for our specific target, or we can omit the toolchain file entirely, in case we want to build an executable to run on our host machine (e.g. for unit testing). If we ever choose to switch to another MCU, we simply create a new toolchain file and our CMakeLists.txt stays mostly the same. Also, the toolchain file can be reused for other projects that use the same MCU.
CMakeLists.txt
Let us start by writing our CMakeLists.txt. For a minimal working example we must specify the minimum required version of CMake, the project name and at least one build target (not to be confused with a target device).
cmake_minimum_required(VERSION 3.15)

project(stm32-without-cubeide
        LANGUAGES C)

add_executable(blink
    main.c
    startup.c
    syscalls.c
    usart.c
    vendor/CMSIS/Device/ST/STM32F4/Source/Templates/system_stm32f4xx.c)

set_target_properties(blink PROPERTIES OUTPUT_NAME "blink.elf")
I have chosen version 3.15, which is a good compromise between compatibility and features, and should be plenty for our needs. I named the project stm32-without-cubeide and also hinted to CMake that we are using the C programming language. Then I defined an executable target blink and specified the source files required to build the target. There is no need to define a separate target for each source file, like we did in the Makefile. CMake will figure out the incremental build automatically. By default, the executable will be named the same as the target (i.e. blink, no extension), so I added a line where I explicitly name the output file blink.elf, just for clarity.
Next, we are going to add all the project-specific compiler and linker flags:
target_compile_options(blink PRIVATE
    --specs=nano.specs)

target_include_directories(blink PRIVATE
    vendor/CMSIS/Device/ST/STM32F4/Include
	  vendor/CMSIS/CMSIS/Core/Include)

target_link_options(blink PRIVATE
    -T ${CMAKE_SOURCE_DIR}/linker_script.ld
    -u _printf_float)
Notice that the flags are being added explicitly to the blink target, not globally. This makes it easy to create multiple targets with different build configurations. The PRIVATE keyword is used to specify the scope of the options in the command. It just means that the options only apply to the blink target itself, and will not be propagated to any target linking to the blink target. Since we do not expect anything to link to our main executable, it doesn’t really matter what we choose in this case. However, if you were building a library with some options that you want to be inherited by anyone linking to the library, you would choose PUBLIC or INTERFACE scope instead. PUBLIC means that the option will be added both to the library itself and anyone linking to it, and INTERFACE means that the options will only apply to targets that link to the library, but not the library itself.
Before we move on to the toolchain file, let us also add the phony target, which in CMake is called a custom target. We first set a few variables specifying the programmer executable and flags, and then we create a custom target to flash the output file of the blink target to the device. I have also made it dependent on the blink target, so that any changes to the source files will trigger a rebuild before flashing.
set(PROGRAMMER openocd)
set(PROGRAMMER_FLAGS -f interface/stlink.cfg -f target/stm32f4x.cfg)

add_custom_target(flash
    COMMAND ${PROGRAMMER} ${PROGRAMMER_FLAGS} -c "program $<TARGET_FILE:blink> verify reset exit"
    DEPENDS blink
    VERBATIM)
Toolchain file
The toolchain file contains any configuration that is required to cross-compile for the target device. It should be reusable across projects using the same device, so it must not contain any project-specific configuration. My toolchain file looks like this:
set(CMAKE_SYSTEM_NAME Generic)
set(CMAKE_TRY_COMPILE_TARGET_TYPE STATIC_LIBRARY)

set(CMAKE_C_COMPILER arm-none-eabi-gcc)
set(CMAKE_CXX_COMPILER arm-none-eabi-g++)
set(CMAKE_ASM_COMPILER arm-none-eabi-gcc)

set(MCU_FLAGS "-mcpu=cortex-m4 -mthumb")

set(CMAKE_C_FLAGS_INIT ${MCU_FLAGS})
set(CMAKE_CXX_FLAGS_INIT ${MCU_FLAGS})
set(CMAKE_ASM_FLAGS_INIT ${MCU_FLAGS})

add_compile_definitions(STM32F410Rx)
Setting CMAKE_SYSTEM_NAME to Generic tells CMake that we are cross-compiling, and setting CMAKE_TRY_COMPILE_TARGET_TYPE to STATIC_LIBRARY ensures that CMake will not try to run test programs on the host. Usually, CMake will try to compile and run a small test program, to verify that the compiler is working. Since our target and host system are not ABI-compatible, the executable will not be able to run on the host.
Next we specify which compilers to use for C, C++ and assembly source files. In our Makefile, we specified the two flags -mcpu=cortex-m4 and -mthumb to tell the compiler which processor and instruction set to compile for. Here we set them as initial flags for all three compilers, so all build targets will have these flags before appending their own. You can see all the ARM-related compiler options in the GCC documentation. Some options are set implicitly just by specifying the CPU. Others, like hardware floating point support, are disabled by default, since not all Cortex-M4-based MCUs have an FPU. We will get back to this in a bit.
We can now try generating the build files with CMake. Make sure you are in the root folder of your project (where both CMakeLists.txt and the stm32f410rb.cmake toolchain file are located). The toolchain file is specified by defining the CMAKE_TOOLCHAIN_FILE variable when calling CMake:
cmake -Bbuild -DCMAKE_TOOLCHAIN_FILE=stm32f410rb.cmakeThis will create a build directory and generate build files for whatever the default generator is on your machine. You can check this with cmake --help, which (among other things) will list the available generators (i.e. build systems) and show an asterisk next to the chosen default. On my system the default is “Unix Makefiles”, meaning it will generate Makefiles for GNU Make. You can explicitly choose a generator with the -G flag.
Now, since my system has generated Unix Makefiles, I can actually build the project in much the same way as we have done so far; by entering the build folder and running make. However, the more generic way of building with CMake is by using the --build flag and pointing to the build directory:
cmake --build buildThis works regardless of the underlying build system. If we want to build a specific target, we can use the --target flag:
cmake --build build --target flashEnabling the floating point unit (FPU)
Now that we can build the project with CMake, let us take a moment to make sure that the compiler generates hardware floating point instructions. According to the datasheet, the STM32F410RB is based on a Cortex-M4 with a single-precision FPU. In the ARM Cortex-M4 reference manual we can see that the specific type is an FPv4-SP floating point unit and we can see a table of all the supported floating point instructions.
Let us start by finding a floating point operation in our code and check which instructions are generated by the compiler. In our super loop in main.c we have the following line with a floating point division:
printf("[%.3f] Hello, World!\r\n", (float)ticks/1000.0);Well, actually, this is a double-precision floating point division, since we have not suffixed the float literal 1000.0 with an f. Our single-precision FPU does not work with doubles, so let us fix that before we continue:
printf("[%.3f] Hello, World!\r\n", (float)ticks/1000.0f);Before building, let us make the compiler add debug information and explicitly turn off optimization by adding the -g and -O0 flags globally in CMakeLists.txt just after the project() command:
add_compile_options(-g -O0)Now, after rebuilding, we can use arm-none-eabi-objdump to inspect the object file generated for main.c:
arm-none-eabi-objdump -S build/CMakeFiles/blink.dir/main.c.objThis will disassemble the object file and show the assembly instructions with the original C source code interleaved. This only works if you compile with the -g option, and the assembly might not make much sense if you allow the compiler to optimize, hence the -O0 flag. If we look for the printf line in the output, we find the following:
    printf("[%.3f] Hello, World!\r\n", (float)ticks/1000.0f);
  e6:   4b10            ldr     r3, [pc, #64]   ; (128 <main+0x90>)
  e8:   681b            ldr     r3, [r3, #0]
  ea:   4618            mov     r0, r3
  ec:   f7ff fffe       bl      0 <__aeabi_ui2f>
  f0:   4603            mov     r3, r0
  f2:   490e            ldr     r1, [pc, #56]   ; (12c <main+0x94>)
  f4:   4618            mov     r0, r3
  f6:   f7ff fffe       bl      0 <__aeabi_fdiv>
  fa:   4603            mov     r3, r0
  fc:   4618            mov     r0, r3
  fe:   f7ff fffe       bl      0 <__aeabi_f2d>
 102:   4602            mov     r2, r0
 104:   460b            mov     r3, r1
 106:   480a            ldr     r0, [pc, #40]   ; (130 <main+0x98>)
 108:   f7ff fffe       bl      0 <printf>
Notice the branch instructions (bl) to the __aeabi_ prefixed functions. Those functions are ARM’s software floating point operations for casting an unsigned int to float (ui2f), floating point division (fdiv) and casting a float to a double (f2d). With a hardware floating point unit, we would expect to see FPU instructions, such as VDIV.F32, being used.
Let us go back to the toolchain file. As mentioned earlier, you can find all the ARM specific options in the GCC documentation. We can instruct the compiler to use the hardware floating point ABI by adding -mfloat-abi=hard and we are also going to specify the exact type of FPU with -mfpu=fpv4-sp-d16. With some CPUs the compiler can infer this automatically, but since we already know that we are dealing with an FPv4 single-precision FPU, we might as well specify it explicitly. After setting the FPU flags, the compiler will automatically define the __FPU_USED symbol, which tells SystemInit() to enable the FPU at the hardware level, by setting bits 20:23 in the Coprocessor Access Control Register of the System Control Block in the Cortex-M4 core:
void SystemInit(void)
{
  /* FPU settings ------------------------------------------------------------*/
  #if (__FPU_PRESENT == 1) && (__FPU_USED == 1)
    SCB->CPACR |= ((3UL << 10*2)|(3UL << 11*2));  /* set CP10 and CP11 Full Access */
  #endif

  ...
Note, CMake does not automatically detect changes to the toolchain file, so we must manually delete the build folder and run the CMake configuration step again.
Now, if we build the project and inspect main.c.obj again, we should see that the hardware floating point instructions are being generated correctly:
    printf("[%.3f] Hello, World!\r\n", (float)ticks/1000.0f);
  e6:   4b10            ldr     r3, [pc, #64]   ; (128 <main+0x90>)
  e8:   681b            ldr     r3, [r3, #0]
  ea:   ee07 3a90       vmov    s15, r3
  ee:   eef8 7a67       vcvt.f32.u32    s15, s15
  f2:   ed9f 7a0e       vldr    s14, [pc, #56]  ; 12c <main+0x94>
  f6:   eec7 6a87       vdiv.f32        s13, s15, s14
  fa:   ee16 0a90       vmov    r0, s13
  fe:   f7ff fffe       bl      0 <__aeabi_f2d>
 102:   4602            mov     r2, r0
 104:   460b            mov     r3, r1
 106:   480a            ldr     r0, [pc, #40]   ; (130 <main+0x98>)
 108:   f7ff fffe       bl      0 <printf>
The ui2f call is now a vcvt.f32.u32 instruction and the fdiv call is now a vdiv.f32 instruction. printf ultimately takes a double as input, so the casting from float to double is still done in software, since that operation is not supported by the FPU.
With the build configuration taken care of, let us move on to adding the library.
STM32CubeF4 MCU Firmware Package
The STM32CubeF4 MCU firmware package is one of several STM32Cube MCU and MPU packages developed by STMicroelectronics to facilitate hardware configuration for each of their MCU/MPU product lines. It is part of the STM32Cube ecosystem, but it can be used independently of STM32CubeMX, STM32CubeIDE and all the other STM development tools. It consists of the CMSIS library (which we are already using), a Low Layer (LL) and Hardware Abstraction Layer (HAL) library, various middleware such as FreeRTOS and mbedTLS, and a bunch of example projects. The package can be downloaded either from the ST website or from the official git repository.
If you want to keep your project lean, you can download the package and any required submodules as ZIP files and manually delete all the stuff you don’t need. For example, if you like to stay close to the hardware and you are not interested in using the HAL, just keep the CMSIS files for your specific MCU and the LL library.
For educational purposes, I am going to add the git repository as a submodule to our project and then pick out the nested submodules that we need. This also allows us to easily pull the latest updates and bugfixes from the repository in the future.
Adding a submodule
To add a git repository as a subdirectory inside an existing git repository, we can use git submodules. To add the Cube repository inside the vendor directory, we will run this from the project root directory:
git submodule add https://github.com/STMicroelectronics/STM32CubeF4 vendor/STM32CubeF4Next, change directory into the submodule and initialize it:
cd vendor/STM32CubeF4
git submodule update --init
The repository consists of a lot of nested submodules for different MCUs in the STM32F4 line. We can list them all by running:
git submodule statusThere are several board support packages (BSPs) for different evaluation boards, various middleware and then the CMSIS library and the HAL library. We are only really interested in the latter two, so we can initialize these without all the others. Make sure your are in the STM32CubeF4 directory and run:
git submodule update --init \
Drivers/CMSIS/Device/ST/STM32F4xx \
Drivers/STM32F4xx_HAL_Driver
Now we have all the necessary source files, but we need to perform a few setup steps before we can build the library.
Initial HAL setup
If we open up the STM32F4 HAL user manual and browse to section 3 (Overview of HAL drivers) and specifically 3.1 (HAL and user-application files), we can get an idea of how the HAL is structured, which user-application files we need to implement to get started, and how to configure and use the HAL.
First we need to add the following files to our project:
system_stm32f4xx.c(Core system functionality)startup_stm32f4xx.s(Startup code with weak ISR declarations)stm32f4xx_hal_msp.c(MCU support package, user-implemented hardware initialization)stm32f4xx_hal_conf.h(HAL configuration header)stm32f4xx_it.c/.h(User-implemented ISRs)main.c/.h
Templates for these files can be found under vendor/STM32CubeF4/Projects/STM32F410xx-Nucleo/Templates in the Inc and Src folder. Since we will be using the startup code provided by ST, it makes sense to also use the provided linker script (.../Templates/STM32CubeIDE/STM32F410RBTx_FLASH.ld) since these are closely related, in that the linker script defines symbols used in the startup code (e.g. _estack) and references functions that are defined in the startup code (e.g. Reset_Handler). We could make these changes manually in our own linker script, but using ST’s will make things a bit simpler for us. Let us create a directory in the root of our project called core and copy all the templates over. Now we can safely edit them, without worrying about losing our changes when we update the submodules. Also, we’ll manually create a main.h in the root of the project to hold global definitions and handles, that are used in other places than main.c, such as in stm32f4xx_it.c.
For now, we can leave most of these files unchanged. The only change I have made is to change the HSE_VALUE to 8000000 in both system_stm32f4xx.c and stm32fxx_hal_conf.h to match our 8 MHz external oscillator.
With all the source files in place, let us move on to building the library with CMake.
Building the library
Since the STM32CubeF4 package does not come with its own CMakeLists.txt, we must write one ourselves. However, we don’t want to place it inside the submodule directory and pollute the repository. Instead, we will create a new directory in our project root called cmake and create stm32cubef4.cmake in there (we can also move our toolchain file in here). We are then going to include() this file in our root CMakeLists.txt.
In the stm32cubef4.cmake we are going to set some variables to specify paths to CMSIS/HAL source and include folders and also specify which source files to build. Then we are going use the add_library() command to build a static library and add the required include directories with PUBLIC scope, so our blink target inherits these paths.
set(STM32CUBEF4_DIR "${CMAKE_SOURCE_DIR}/vendor/STM32CubeF4")
set(HAL_ROOT_DIR "${STM32CUBEF4_DIR}/Drivers/STM32F4xx_HAL_Driver")
set(HAL_SOURCE_DIR "${HAL_ROOT_DIR}/Src")
set(HAL_INCLUDE_DIR "${HAL_ROOT_DIR}/Inc")

set(HAL_SOURCES
    "${HAL_SOURCE_DIR}/stm32f4xx_hal.c"
    "${HAL_SOURCE_DIR}/stm32f4xx_hal_rcc.c"
    "${HAL_SOURCE_DIR}/stm32f4xx_hal_cortex.c")

add_library(stm32cubef4 STATIC ${HAL_SOURCES})

target_include_directories(stm32cubef4 PUBLIC
    ${STM32CUBEF4_DIR}/Drivers/CMSIS/Core/Include
    ${STM32CUBEF4_DIR}/Drivers/CMSIS/Device/ST/STM32F4xx/Include
    ${STM32CUBEF4_DIR}/Drivers/STM32F4xx_HAL_Driver/Inc
    ${CMAKE_SOURCE_DIR}/core)
In the root CMakeLists.txt (after the add_executable() command) we are going to include() the .cmake file, so the library will be built, and then link our blink target to the stm32cubef4 static library:
include(cmake/stm32cubef4.cmake)
target_link_libraries(blink stm32cubef4)
In the CMSIS STM32F4 device header stm32f4xx.h, ST have added the following conditional include:
#if defined (USE_HAL_DRIVER)
#include "stm32f4xx_hal.h"
#endif /* USE_HAL_DRIVER */
So if we add the USE_HAL_DRIVER definition to our compiler definitions, stm32f4xx_hal.h is automatically included when we include stm32fxx.h. USE_HAL_DRIVER seems to only be used for this purpose, so omitting the compiler definition and just manually including stm32f4xx_hal.h wherever you need it should be just fine as well. For demonstration purposes, I am going to add USE_HAL_DRIVER as a global compiler definition at the top of our root CMakeLists.txt just after the project() command, but before any build targets are defined:
add_compile_definitions(USE_HAL_DRIVER)Since we are using a new startup file and moved a bunch of files to the core directory, we need to update the blink target sources. For good measure, let us define a variable BLINK_SOURCES and pass that to the add_executable() command. Also, we are going to add both the root directory and core directory to the blink target include path and update the path to the new linker script:
set(BLINK_SOURCES
    main.c
    core/syscalls.c
    core/startup_stm32f410rx.s
    core/system_stm32f4xx.c
    usart.c)

add_executable(blink ${BLINK_SOURCES})

target_include_directories(blink PRIVATE
    ${CMAKE_SOURCE_DIR}
    ${CMAKE_SOURCE_DIR}/core)

target_link_options(blink PRIVATE
    -T ${CMAKE_SOURCE_DIR}/core/STM32F410RBTx_FLASH.ld
    -u _printf_float)
Last thing we need to do before we build, is just make CMake aware that it now also needs to compile assembly code (core/startup.stm32f410rx.s). We do this simply by appending ASM to the LANGUAGES in the project() command:
project(stm32-without-cubeide
        LANGUAGES C ASM)
Now we should be able to build the project with CMake as usual, so let us now try to actually apply the HAL in our application.
Rewrite application to use HAL
Using the HAL library is fairly straight-forward once you get the hang of it, so I will not go into too much detail here. I suggest reading through all of section 3 in the user manual, which will explain the different structures used for peripheral handles and initialization, how the drivers are generally used and how to initialize the HAL. Then to learn more about a specific driver, you can browse to that specific section, which goes more in depth about the features of the peripheral and how to configure it.
The first thing that we need to do, is to initialize the HAL at the very start of our application:
void main(void)
{
  HAL_Init();
  ...
This initializes the SysTick timer and calls the user-implemented HAL_MspInit(), which we can implement in stm32f4xx_hal_msp.c if we need to do any system-wide hardware initialization. We can now delete all our previous SysTick initialization calls (SysTick_Config() and __enable_irq()) as well as the ticks variable, and the functions systick_handler() and delay_ms(). The new startup code now defines the SysTick interrupt handler as SysTick_Handler() which is already defined in the stm32fxx_it.c template:
void SysTick_Handler(void)
{
  HAL_IncTick();
}
Also the HAL features a HAL_Delay() function which we can now use in our main loop instead of delay_ms():
while(1)
  {
    GPIOA->ODR ^= (1 << LED_PIN);
    printf("[%.3f] Hello, World!\r\n", (float)ticks/1000.0f);
    HAL_Delay(500);
  }
Clock configuration
As stated in section section 3.11.1 of the user guide, to configure the system clock we need to use the two functions HAL_RCC_OscConfig () and HAL_RCC_ClockConfig() each of which take an initialization structure as input. Of course, we also need to enable the clock for the power controller and configure the voltage scaling mode like we did in part 2, but the HAL features a few handy macros so we do not have to set the bits manually. The new clock initialization looks like this:
void clock_init()
{
  __HAL_RCC_PWR_CLK_ENABLE();
  __HAL_PWR_VOLTAGESCALING_CONFIG(PWR_REGULATOR_VOLTAGE_SCALE1);

  RCC_OscInitTypeDef osc_init = {0};
  osc_init.OscillatorType = RCC_OSCILLATORTYPE_HSE;
  osc_init.HSEState = RCC_HSE_BYPASS;
  osc_init.PLL.PLLSource = RCC_PLLSOURCE_HSE;
  osc_init.PLL.PLLState = RCC_PLL_ON;
  osc_init.PLL.PLLM = 4;
  osc_init.PLL.PLLN = 200;
  osc_init.PLL.PLLP = RCC_PLLP_DIV4;
  osc_init.PLL.PLLQ = 8;
  if (HAL_RCC_OscConfig(&osc_init) != HAL_OK)
  {
    while(1);
  }

  RCC_ClkInitTypeDef clock_init = {0};
  clock_init.ClockType = RCC_CLOCKTYPE_SYSCLK |
                         RCC_CLOCKTYPE_PCLK1 |
                         RCC_CLOCKTYPE_PCLK2 |
                         RCC_CLOCKTYPE_HCLK;
  clock_init.SYSCLKSource = RCC_SYSCLKSOURCE_PLLCLK;
  clock_init.AHBCLKDivider = RCC_SYSCLK_DIV1;
  clock_init.APB1CLKDivider = RCC_HCLK_DIV2;
  clock_init.APB2CLKDivider = RCC_HCLK_DIV1;

  if (HAL_RCC_ClockConfig(&clock_init, FLASH_LATENCY_3) != HAL_OK)
  {
    while(1);
  }
}
We still need to call the SystemCoreClockUpdate() after clock_init() in main(), to let the HAL know that we modified the clock tree.
GPIO initialization
To initialize the GPIO for the LED, we enable the clock domain for GPIOA, create an initialization structure and pass it to HAL_GPIO_Init():
  __HAL_RCC_GPIOA_CLK_ENABLE();

  GPIO_InitTypeDef gpio_init = {0};
  gpio_init.Pin = LED_PIN;
  gpio_init.Mode = GPIO_MODE_OUTPUT_PP;
  gpio_init.Pull = GPIO_NOPULL;
  gpio_init.Speed = GPIO_SPEED_LOW;
  gpio_init.Alternate = 0;

  HAL_GPIO_Init(LED_PORT, &gpio_init);
I have defined LED_PORT and LED_PIN in main.h.
We can also swap out the bit toggle in the main loop with the HAL_GPIO_TogglePin() function:
  while(1)
  {
    HAL_GPIO_TogglePin(LED_PORT, LED_PIN);
    printf("[%.3f] Hello, World!\r\n", HAL_GetTick()/1000.0f);
    HAL_Delay(500);
  }
UART initialization
Since the UART can be mapped to a number of different GPIO pins, we need a way to choose the specific GPIO pins we want to use as TX/RX, before we call HAL_UART_Init(). We do this by implementing HAL_UART_MspInit() in stm32f4xx_hal_msp.c, which will then be called internally by HAL_UART_Init(). We will also enable the required clock domains in there:
void HAL_UART_MspInit(UART_HandleTypeDef *huart)
{
  if (huart->Instance == USART2)
  {
    __HAL_RCC_USART2_CLK_ENABLE();
    __HAL_RCC_GPIOA_CLK_ENABLE();

    GPIO_InitTypeDef rx_tx_init = {0};
    rx_tx_init.Pin = GPIO_PIN_2 | GPIO_PIN_3;
    rx_tx_init.Mode = GPIO_MODE_AF_PP;
    rx_tx_init.Alternate = GPIO_AF7_USART2;
    rx_tx_init.Pull = GPIO_NOPULL;
    rx_tx_init.Speed = GPIO_SPEED_FAST;

    HAL_GPIO_Init(GPIOA, &rx_tx_init);
  }
}
If you intend to ever deinitialize the UART, you should also implement HAL_UART_MspDeInit().
Now, since the UART initialization code will be quite a bit shorter than before, and we no longer need the usart_write() function (we will use HAL_UART_Transmit() instead), it doesn’t make much sense to have a separate usart.c/.h anymore, so let us delete those files. We will then initialize the UART in main() instead. To use the UART after we have initialized it, we need to refer to it by its handle (of type UART_HandleTypeDef). This is a struct that contains a pointer to the selected UART peripheral, an initialization structure and a bunch of state variables. I am going to define the handle as a global variable in main.c and then declare it extern in main.h, so other parts of our program can access it. Then we can fill out the initialization structure and pass it to HAL_UART_Init(). Notice that we can just specify the baud rate directly and let the init function compute and set the correct register value:
UART_HandleTypeDef uart2;

...

void main(void)
{
  ...

  uart2.Instance = USART2;
  uart2.Init.BaudRate = 115200;
  uart2.Init.Mode = UART_MODE_TX;
  uart2.Init.HwFlowCtl = UART_HWCONTROL_NONE;
  uart2.Init.WordLength = UART_WORDLENGTH_8B;
  uart2.Init.StopBits = UART_STOPBITS_1;
  uart2.Init.Parity = UART_PARITY_NONE;
  uart2.Init.OverSampling = UART_OVERSAMPLING_16;
  if (HAL_UART_Init(&uart2) != HAL_OK)
  {
    while(1);
  }

  ...
}
Since we are now using HAL_UART_Transmit() instead of usart_write(), we must also swap out the function call in syscalls.c so printf() still works:
#include "main.h"

...

int _write(int file, char *ptr, int len) {
  (void) file;
  HAL_UART_Transmit(&uart2, ptr, len, HAL_MAX_DELAY);
  return len;
}
We can now build and flash the program to the device and ensure that everything is working, by checking that the LED is blinking and that we are receiving messages over UART.
Conclusion
Now we have set up a robust build system with CMake and added the HAL/LL library, which makes it much easier for us to configure and interact the with the hardware. If you find that the HAL adds too much bloat, feel free to just use the LL library exclusively. If you, on the other hand, would like a bit more hand-holding while setting up the peripherals, you can try using STM32CubeMX to generate your project files. Either way, hopefully this post gave you a rough idea of how you can use CMake and the STM32 HAL library in your own projects.
In part 5 we are going to take a look at remote debugging with the GNU debugger (gdb).
great content
Very good, comprehensive content about building without CubeIDE and using CMake for STM32.